In a world where all Glocks are boringly the same, adding a little simple color can both serve a practical purpose as well as set your gun apart with a minimum of effort.
Why?
First off, this is a simple user modification that does not affect how the gun shoots, carries, or presents in any way, and is typically reversible if you don’t like it– without damaging your firearm. Purely cosmetic in nature, filling in the roll marks on the slide of your Glock allows the factory markings to be more easily readable.
For the Glock owner who has several similar models, for instance, both a G17 and a G22, or both a G19 and a G23, this mod can help to tell the pistols apart quickly and from a distance. This, especially if you are at the range with multiple caliber Glocks and may have the possibility to accidentally put a magazine full of 9mm into a .40 cal S&W with potentially kaboom results, can be a very important distinction.
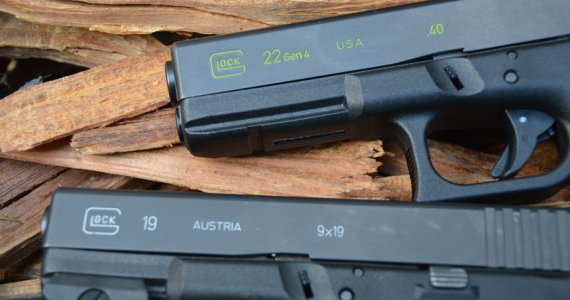
Further, it allows one to be able to see subtle differences in slide markings that you may not have noticed prior. For example, look at the right–hand view of this Gen 4 Glock 22– you can see the outline of the state of Georgia with the “P” proof mark showing the gun was made in the U.S.

Now contrast that it to the legacy G-lock logo of a Gen 3 Glock 19 made in Austria.

Tip: Also, filling in the serial number with color such as shown above can ease cataloging the gun– which all gun owners should keep an ever-updated personal log of their firearms for insurance purposes. According to a recent U.S. Department of Justice study, there is an average of at least 135,000 unrecovered guns stolen in burglaries nationwide each year. One of the main reason for guns recovered by police but not and returned to their owners is that the owner did not record and keep up with their serial numbers.
What about the front? In even the low-rez image at the top of the post, we see the caliber, model, and place of manufacture is clear as a bell after being colored in.
Options
Filling in your roll marks can be done with several readily available household items.
Some enthusiasts use various paints such as Testors enamels— you know, the hobby paint you used as a kid for scale models– either in the brush-on variety or paint marker which is available from a number of makers. These generally will endure temperature ranges from -50 F to 150 F, especially in the case of Lacquer Stik and are the most durable option. Application of raw paint (if you aren’t using a marker) can be done with an extra fine pointed brush, toothpick, razor blade or a needle. You will want to use some sort of solvent to strip away excess when you are done. However, if you don’t mind getting your fingers dirty you can always just wipe the area with your finger after you apply the paint.
There is also the use of fingernail polish which I personally don’t like because, well, it’s fingernail polish. In using this method, you simply take the desired color and swipe it on, then after it dries dab it up with some non-acetone nail polish remover on a rag or Q-tips.
My favorite? The snack food of Marines everywhere:

Pulling it off
First, you want to make sure you are safe so remove your magazine, rack your slide (three times), and both visibly and physically check for any brass or ammo. Remove any brass and ammo from the room before you start your color-up campaign. A tabletop armorer’s pad can help keep your parts separate and at hand.
No matter which method you use to add color to your gun, you want to start with a clean surface. This means take your metal surfaces and clean them with mineral spirits, rubbing alcohol, or both. Stay away from oil-based solvents and anything that is advertised as a lubricant as this will leave a thin coat of residue behind.
Then make sure it’s clean and dry. It is best to wear latex or otherwise vinyl/rubber gloves to help keep the grease from your fingers off the gun while you are working on it, and likewise paint/chemicals off your fingers. On another safety tip, use this stuff in a ventilated area.
Once all this is done, you simply grab your Crayola of choice, and fill in the roll mark against the grain– feel free to really press it in, you aren’t going to hurt your slide with wax.

Next, vigorously wipe away the excess with a rag and call it a day. I find that, even with using regular CLP products and extensive regular carry, the crayon method holds up and is easily touched up down the road. If you want to strip it off, use a hair dryer or warm air blower and a plastic teeth brush (who has just one tooth?).
In the end, this simple mod is easy on the wallet and the eye.